How should you get your iPhone ready and optimized for a trip abroad? This is an important topic, as the unpredictable realm of travel can be full of surprises and challenges.
Imagine navigating a bustling city with a shaky internet connection, only to have your iPhone’s battery run almost flat. You get lost and struggle to reach your next destination. To make matters worse, you try to communicate in a foreign language but struggle with basic phrases because you didn’t explore translation tools beforehand.
Besides, picture feeling helpless because you didn’t download local apps that make your trip easier or prepare your apps to work offline.
There’s also the constant worry about keeping your data secure, especially when accessing financial or sensitive information.
Even if your travel plans go smoothly, these scenarios can be incredibly stressful. However, if you set up your iPhone optimally, it can be a game-changer.
Without further ado, here’s a comprehensive guide on what to do with your iPhone – and how to maximize its potential while you travel.
Connectivity: Staying Online On-The-Go
The first thing to tackle is internet connectivity, without a doubt. Navigating a foreign city is almost impossible with the help of the internet.
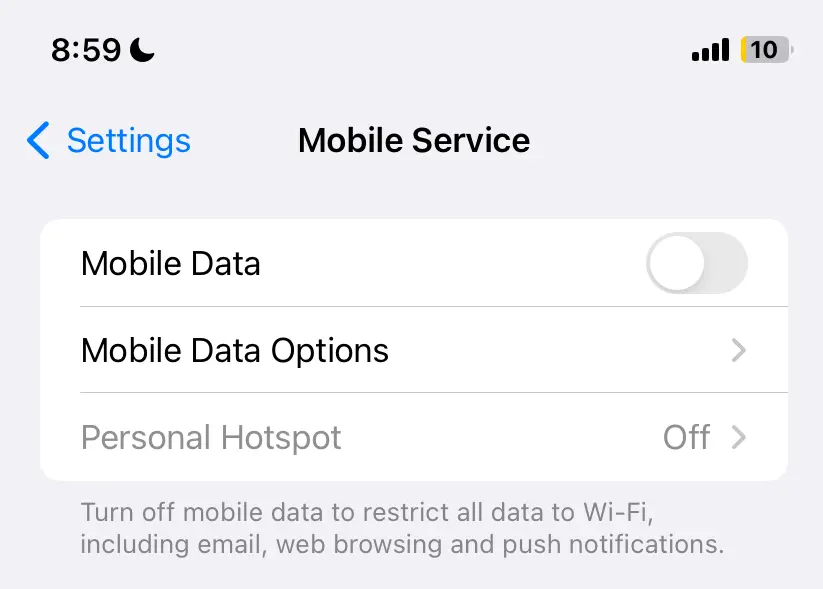
When traveling, you should be mindful of data charges to avoid unexpectedly high phone bills. One basic measure is to turn OFF data roaming on your iPhone. Data roaming often comes with exorbitant fees if it is not included in your mobile plan. So disable data roaming to prevent your phone from using data without your consent, unless you plan to purchase an affordable international data plan from your mobile carrier (which is an option we’ll explore).
Before visiting a foreign country for the first time, spending a little time upfront to understand your internet options can lead to substantial savings. Researching roaming options, data plans, and local SIM card options can save you significant money on data and call charges.
Internet Connectivity Options
When traveling abroad, keep your iPhone fully functional and stay connected by activating a suitable international data plan, using a local SIM card or eSIM, or accessing public WiFi networks (with a VPN when necessary).
Let’s take a closer look at these settings and options available.
1. Find the best international data plan
You could use data roaming under the right conditions without incurring excessive costs.
Some mobile phone plans may include some degree of free/complimentary international roaming, enabling some extent of overseas phone use without additional charges.
Many carriers offer international plans that provide a set amount of data at a flat rate, which can be more cost-effective than standard roaming charges.
These plans often feature competitive rates, such as monthly/weekly packages or day passes, tailored to different destinations. For instance, an international data plan might allow you to roam Asia with 4GB for $15 over a maximum validity period of 14 days, while another plan might allow you to roam a specific destination like Malaysia or Thailand at a different rate.
To take advantage of these plans, purchase a plan from your carrier that suits your needs and budget.
You should still be mindful of your data usage. Exceeding the data allowance of your international plan will result in additional charges as you may need to purchase extra data.
Hence, if you are going with an international data plan, do the following:
- Keep track of your data usage through your carrier’s app or settings on your iPhone to ensure you stay within your plan’s limits.
- To avoid unexpected costs, monitor your data consumption regularly and consider using WiFi whenever possible.
Keeping track of your data usage on iPhone
Just before embarking on your international trip, reset your mobile data usage statistics on your iPhone. This allows you to accurately track your roaming data usage from zero, helping you avoid exceeding the data limit of your purchased plan.
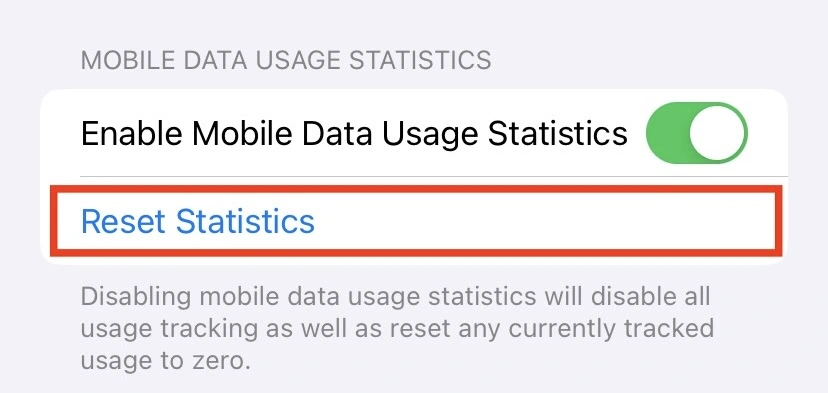
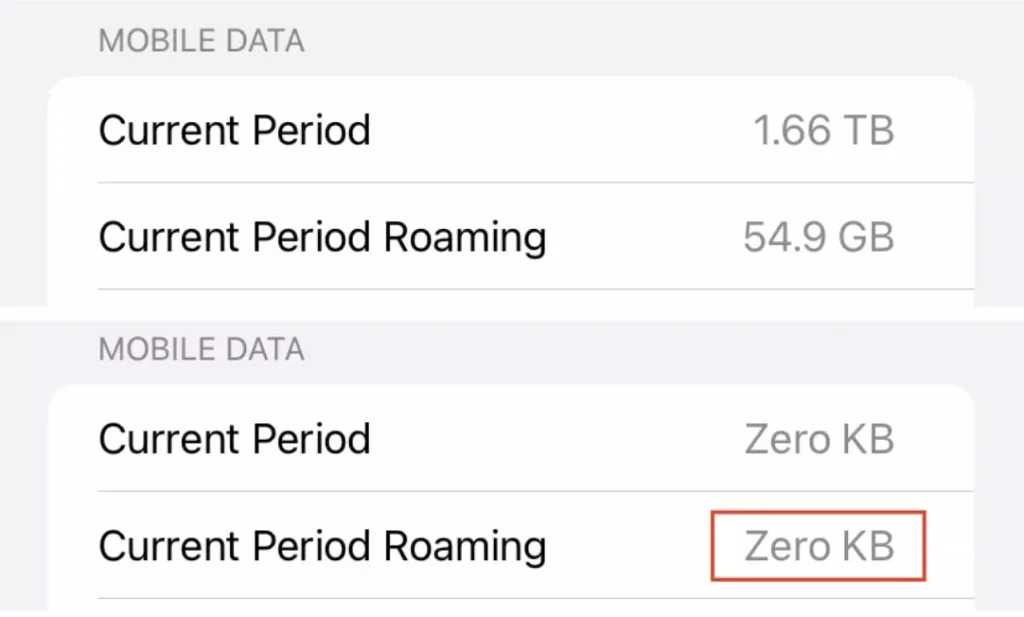
By starting fresh, you can monitor your data consumption more effectively, ensuring you stay within your plan’s limits and prevent additional charges.
Regularly checking your data usage during your trip will help you manage your expenses and maintain connectivity without unexpected costs.
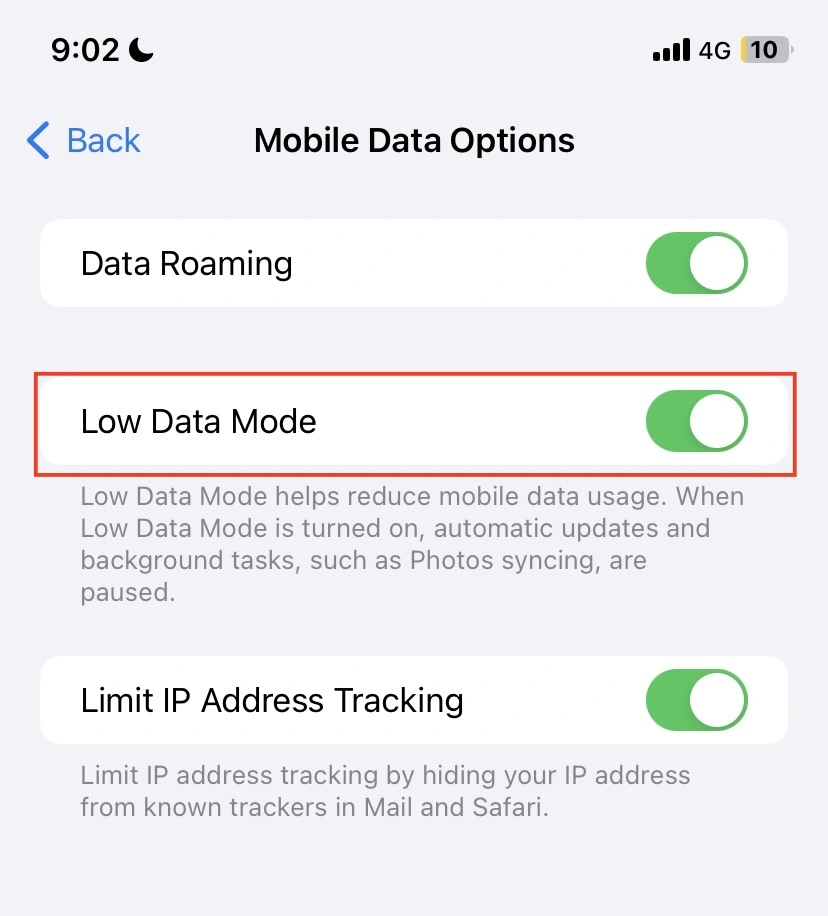
Side-note: If you are concerned about data use, there’s a Low Data Mode setting on your iPhone. You can enable Low Data Mode to conserve your roaming data when it’s running low. However, be aware that this setting will limit background activities and automatic updates, which may impact some of your phone’s normal functions.
2. Use a local SIM Card
This option allows you to replace your existing SIM card with one from a local carrier, which grants you access to data services at local rates.
This is usually a cost-effective option for longer trips abroad compared to purchasing international data plans.
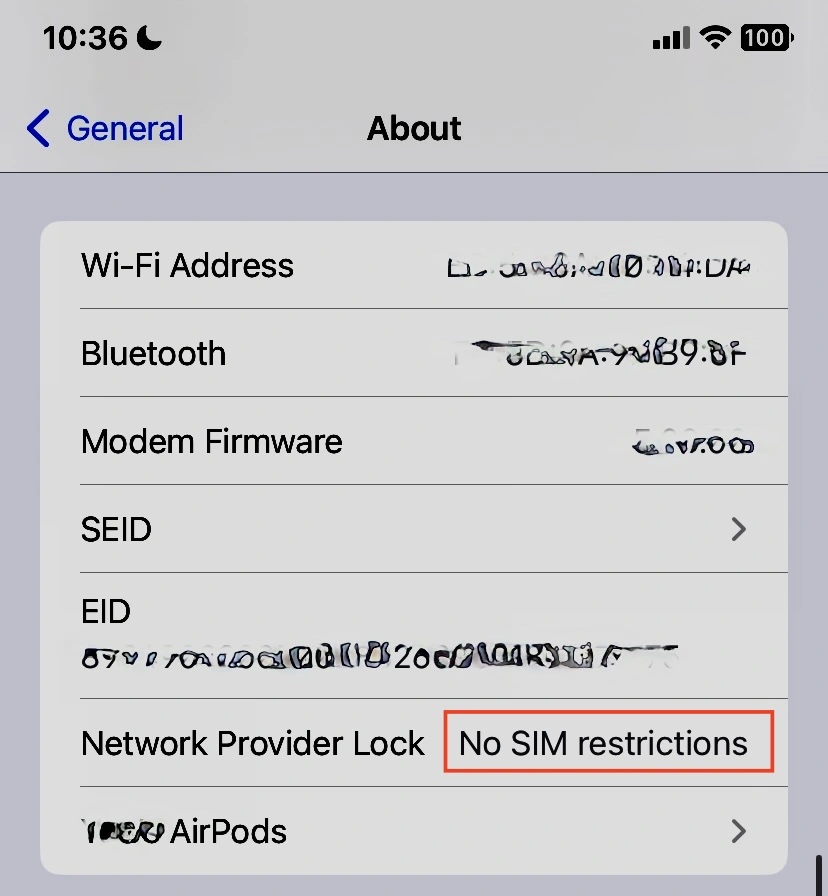
Important note: If you are going with this option, you must ensure that your iPhone is unlocked. Some carriers lock phones to their network, preventing the use of other SIM cards. If it’s locked, contact your carrier to unlock it before your trip, so that you can temporarily replace your existing SIM card with physical SIM cards from local carriers in the country you’re visiting.
3. Use an eSIM
If your phone is unlocked, you can use eSIMs from different carriers. Apple provides a list of carriers that support eSIM on their website.
Most iPhones support eSIM technology, allowing you to activate a mobile plan without a physical SIM card, making it a convenient option for travelers.
Here’s how you can purchase an eSIM plan. You can buy an eSIM from your home carrier before you leave or from a local carrier once you reach your destination. Some carriers allow you to buy an eSIM online through their website or app. For local carriers, visit a mobile store and get an eSIM plan. They typically provide a QR code on a piece of paper.
To activate the eSIM on your iPhone:
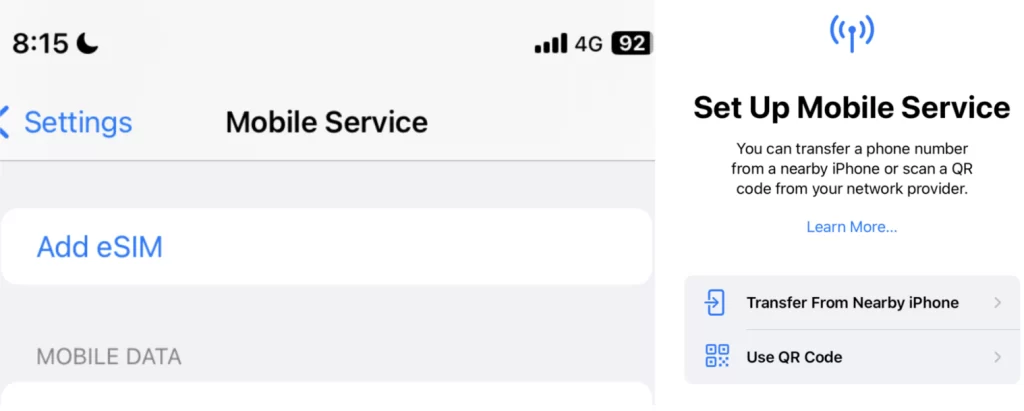
- Open the Settings app and navigate to Mobile Service or Mobile Data.
- Tap Add eSIM or Add Cellular Plan.
- Use your iPhone to scan the QR code provided by the carrier. Follow the instructions on your screen to complete the setup.
With an eSIM, you can have two active numbers on your iPhone—your physical SIM and the eSIM. You get to use your home country’s number for texts and calls while using the local eSIM for data and local calls.
This dual SIM functionality is beneficial if you prefer to stay connected on multiple numbers without swapping SIM cards.
4. Use WiFi networks
This is the most cost-effective option since it is free of charge, but it’s overall pretty inefficient. You only get internet access when you gain access to a WiFi network.
Connect to WiFi networks at your hotel, the airport, and various cafes — use secure protocols like HTTPS or a VPN before connecting when necessary.
WiFi and Bluetooth Settings
What about managing WiFi and Bluetooth connectivity – do you simply leave them on during your trip?
Leaving both your WiFi and Bluetooth ON can increase your convenience and efficiency. For instance, by leaving your WiFi on and connecting to WiFi networks, you can significantly reduce your mobile data usage, avoiding additional data roaming charges. Leaving your Bluetooth on keeps multiple devices connected such as your wireless bluetooth headphones, fitness trackers, and keyboard/mice.
On the other hand, here are two less considered but useful occasions to turn WiFi and Bluetooth OFF.
Turning WiFi and Bluetooth OFF when not in use can help conserve battery life, which can be crucial when your battery is running low in situations when you’re outside of your accommodation.
If you bought an international data plan, the other time to turn OFF WiFi and instead use your overseas data plan is when you need enhanced security:
- Unlike WiFi, connecting to mobile data offers encryption that helps with safeguarding sensitive personal or corporate data.
- Alternatively, you leave your WiFI on but connect to a VPN before accessing any sensitive information online. If you’re using a VPN, here’s a guide on how and when to toggle your VPN on/off during your trips.
This article was originally published on unboundist.com. If it is now published on any other site, it was done without permission from the copyright owner.
General iPhone Apps for Travel
Before going abroad, ensure that your iPhone has a complete list of apps ready for travel-specific uses, such as assessing critical documents, managing flight and hotel bookings, navigating new cities and various in-flight and offline uses. Examples are:
- Specific airline apps
- Cloud apps like iCloud, Google Drive, or Dropbox
- Navigation apps like Google Maps and Grab/Uber
We’ll proceed to cover a few helpful apps for your iPhone.
Translation Tools
When you travel somewhere where most locals speak little to no English, use translation tools to mitigate language barriers. They range from free options to paid versions that offer a wider range of functionalities.
Google Translate is a free tool with a good range of translation features. Here are some you will find useful:
1) Text-to-text translation: This is a less risky feature than voice translation, as typing text directly into the app reduces the likelihood of errors compared to voice input. Yet, it’s less convenient in social interactions due to the need to type.
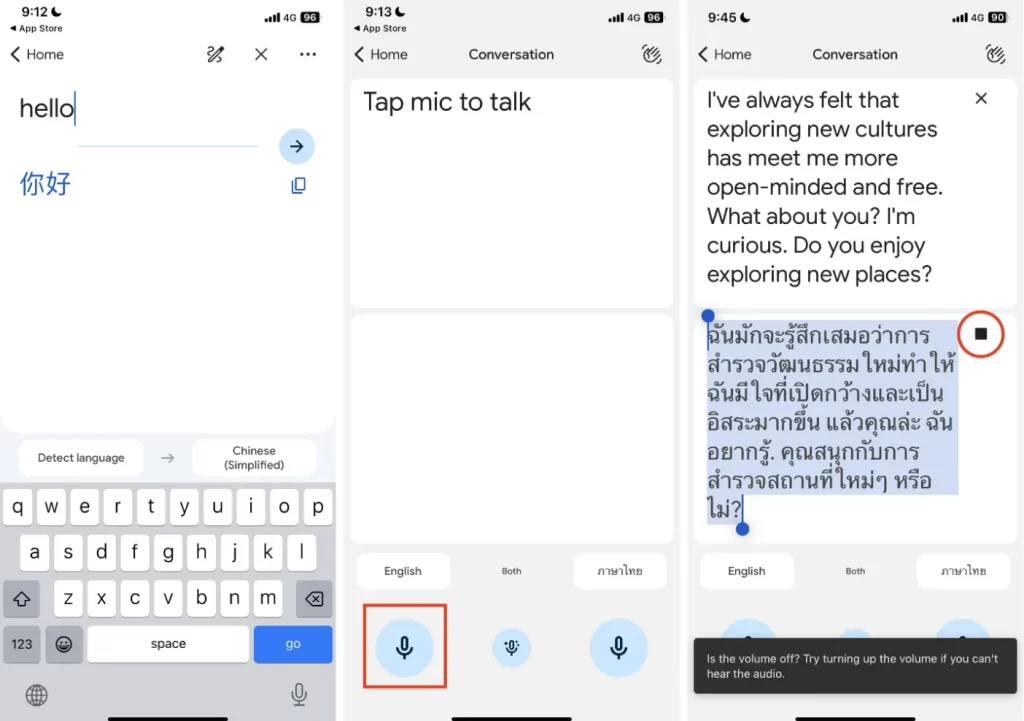
2) Voice translation: This feature is beneficial during business meetings or social gatherings where multiple languages are spoken. It better enhances interactions compared to text-to-text translation.
For instance, during a date, placing your phone in the center of the table allows both parties to converse naturally. Once the voice-to-text translation is done, simply tap the play or listen button to hear the translated text in a different language. Positive vibes are crucial, so speaking clearly and confidently helps the app accurately capture and translate your voice. Otherwise, you may end up repeating phrases and looking frustrated.
While not always 100% accurate, Google Translate’s voice-to-text function is generally reliable enough to convey the intended message without frequent errors or misunderstandings.
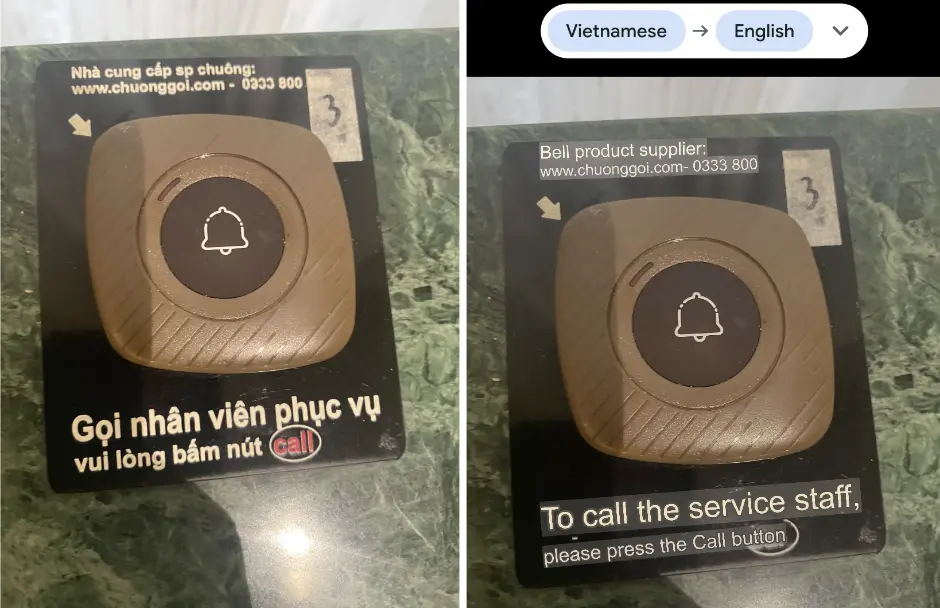
3) Image-to-text translation
I find image-to-text translation very useful during travel. Here are some common scenarios and applications:
- Checking dining instructions and menus at a restaurant
- Purchasing the right essentials you need for your trip
- Comparing grams and prices of different groceries
- Directional signs
- Descriptive text in museums
Here are some examples using the visual lookup tool of Google Translate.

Cloud Storage and Offline Access
You want to use cloud storage to conveniently access your documents during a trip. Two things to note:
- Store important documents: Store important documents like your passport backup and boarding passes. Otherwise, accessing such key travel documents, itineraries, or tickets becomes cumbersome.
- Offline Access: Download documents for offline use to ensure you have access to critical information when needed.
Utilize Apple’s iCloud on your iPhone to store documents for seamless access between your MacBook and iPhone.
When you check in on your flight online, I suggest downloading your e-boarding pass and storing it on iCloud. With an e-boarding pass, many airlines allow you to proceed directly to the gate if you have no checked luggage. However, some airlines and airports may require a document check at the check-in counter, so it’s best to verify specific requirements ahead of time. An e-boarding pass is also a good backup, should you lose your physical pass.
Besides, use iCloud to store educational and recreational materials that you can download to your smartphone before a flight.
Alternatives to iCloud are Microsoft Office and Google Drive, so ensure you have one of these cloud apps downloaded on your phone.

You can also add your mobile boarding pass to your Apple Wallet if this option is available. Check if your airline supports passes in the Wallet app. By doing so, you can receive notifications and automatic updates if there are any flight changes, ensuring you stay informed about your travel details.
Shared Content During a Trip
When traveling with others, you may want to share content in real-time as you move.
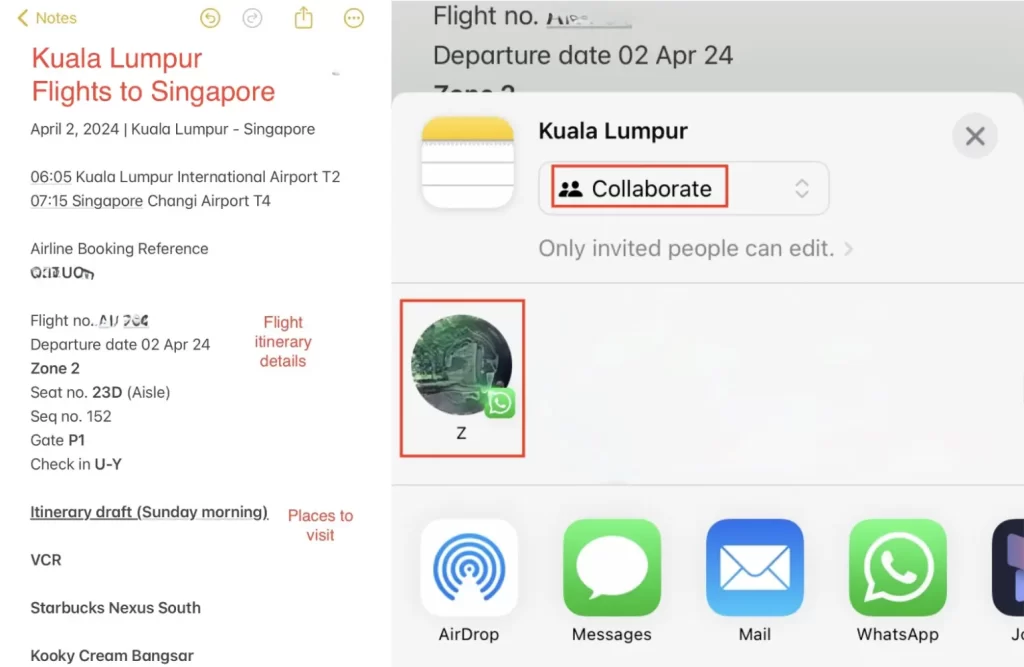
Your iPhone’s apps allow you to share content seamlessly, such as your photos and itineraries. For instance:
- Shared Photo Library: Create a shared photo library to easily share photos with travel companions or distant friends and family.
- Shared Notes: Use the Notes app to share itineraries, lists, and important information. I find the Notes app very convenient for drafting and making changes on the go, due to its straightforward interface; it’s often smoother and less laggy than Google Docs.
These tools ensure everyone stays connected and informed throughout the journey.
Destination-Specific Apps
Thereafter, the next set of apps you should download are destination-specific apps. These are apps used only in the specific city or country you are visiting, and may not be relevant for other cities or countries.
Here’s a simple example – Grab is a transportation app widely used in Southeast Asian cities.
However, in Bangkok, you may stumble upon Bolt, a similar transport app but only available in Thailand. While Bolt could be very handy and often offer cheaper prices, it is destination-specific to Thailand and unavailable in other Southeast Asian cities. Thus you might never use it anywhere else.
Likewise, Zalo is a popular messaging app in Vietnam, widely used by many businesses and locals. But you may never need Zalo in another destination you visit.
From e-hailing to communication, downloading such destination-specific local apps can help you save time and more. Some apps offer discounts, deals, and promotions for local services.
Offline Functionality
Offline Maps
Offline maps are useful in areas where internet connection is weak or unavailable, and in situations where you want to go offline to conserve data and battery.
On Google Maps, first, you can save various places you want to visit by adding them to a list. Once you have marked your destinations, you can download the map for the area that includes these saved places. This downloaded map will be available offline, allowing you to view details such as a shop’s opening/closing hours and get directions, even without an internet connection.
To download an offline map for a specific place, here is the simplified breakdown of steps:
- Open Google Maps and search for the location.
- Tap the name or address, then select “Download” to save the area.
- Adjust the download area to ensure it includes all desired spots.
- For example, when visiting Saigon Skydeck and its surroundings in District 1 of Ho Chi Minh City, search for Saigon Skydeck, tap “Download offline map,” adjust the area, and confirm the download.
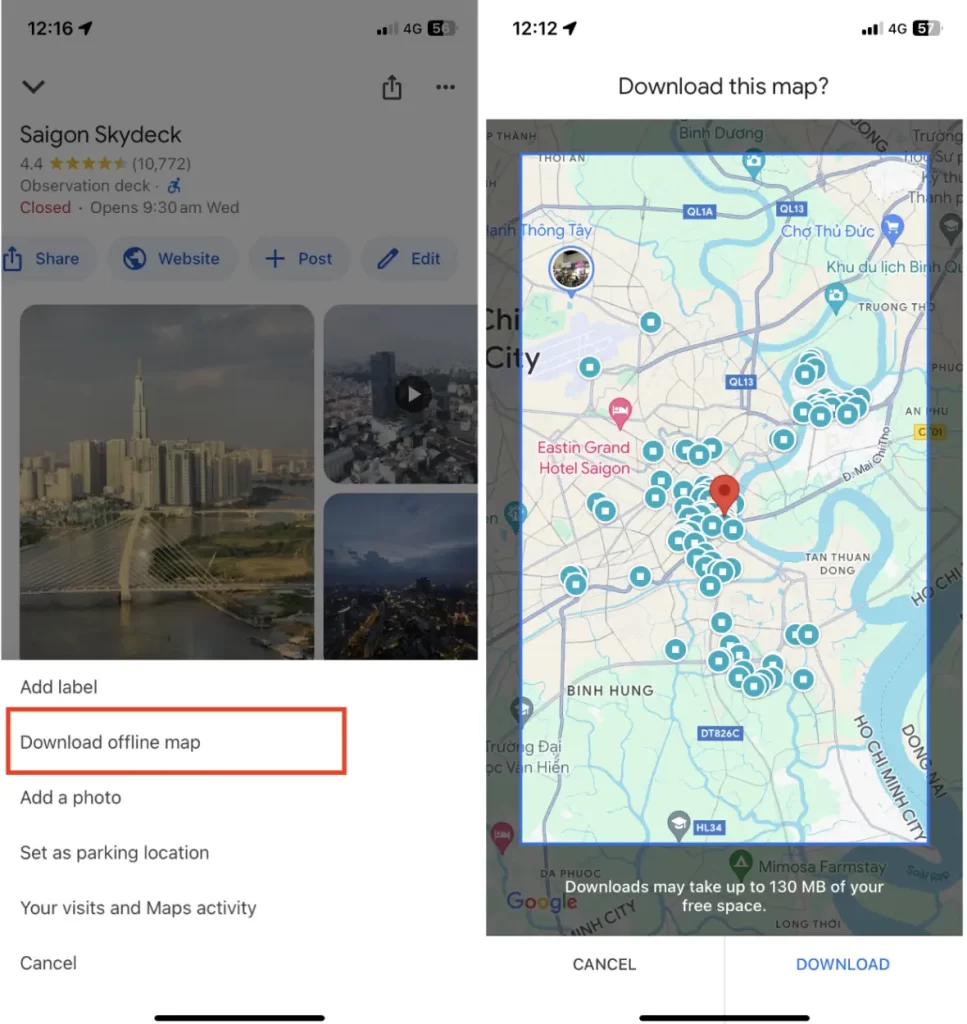
Even without an internet connection, you can now view details such as a shop’s opening and closing hours. You can get directions from place A to B, as long as the entire route is within the downloaded offline map.
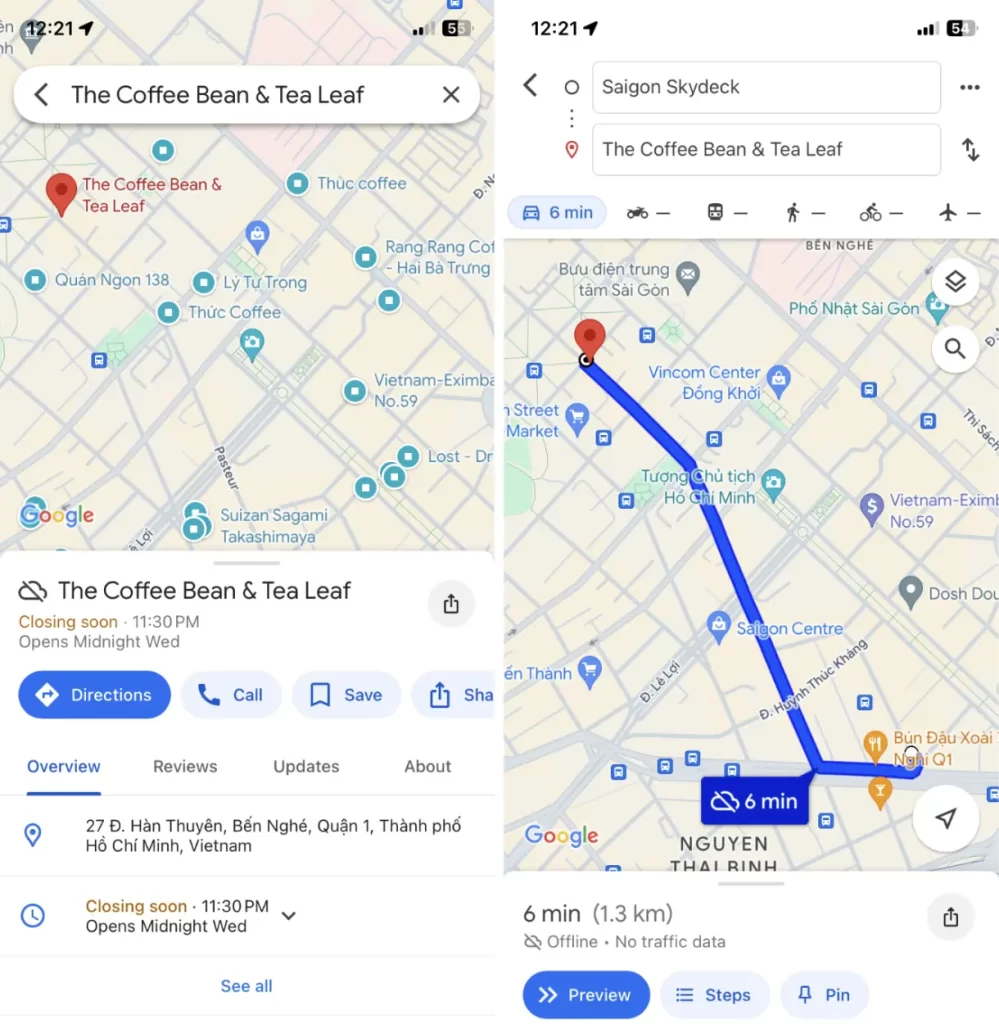
Bear in mind that you’ll likely not get full functionality like you would online. While you get offline driving directions, Google mentioned that transit, bicycling, or walking directions are unavailable offline.
Offline Modes in Productivity Apps
What about productivity without internet – can you stay connected and productive without the use of WiFi or data?
In instances where Wi-Fi isn’t available or reliable, you can choose to utilize offline capabilities of apps. For example, apps like Pocket can be used for reading articles while offline. You can always pre-download eBooks, music, or podcasts for entertainment. Google Drive enables you to function offline on a chosen account.
Better still, prepare for a lack of connectivity by planning how to stay least disrupted and most functional when disconnected from the internet – using this list of strategies.
Create a Separate Folder for Travel Apps
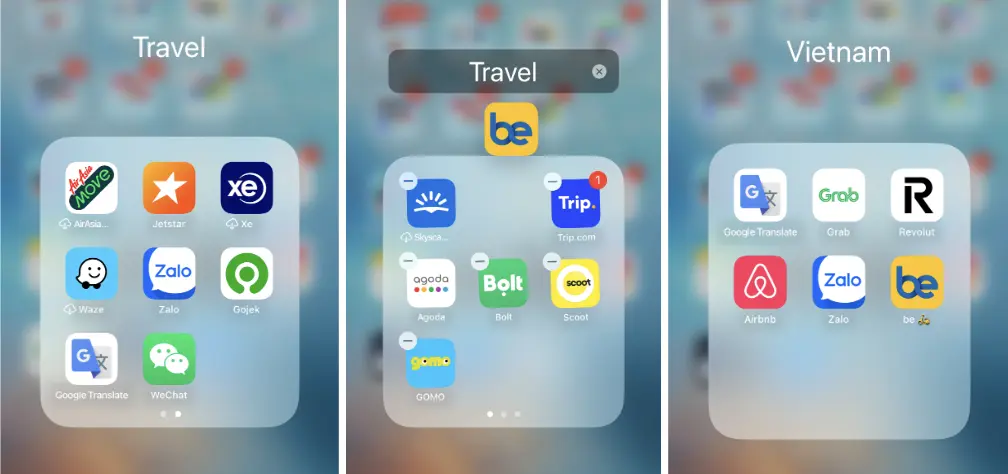
Once you’ve identified the apps you require for travel and your particular destination, download or update them. Organize them on your iPhone – you could set up a folder on your home screen named ‘Travel’ for simplicity.
It’s also helpful to create a folder to organize apps in a particular city for quick access.
For instance, when you are in Vietnam, you may already know how to quickly access your phone’s Whatsapp or Facebook, as these may be apps that you regularly use.
However, you may take time to locate a less-used app on your smartphone in times of need, such as Zalo, used for communication and local services in Vietnam, or Be, an e-hailing and ride-sharing app used in Vietnam.
Take 3-6 of your most frequently used apps and transfer them into a convenient, quick-access folder for your destination. This helps you find the app very easily just by opening this folder.
Security: Protecting Your Data On-The-Go
Next, many travelers would deem phone security measures unnecessary. Most likely, you haven’t encountered any security issues when you were abroad.
Yet, it’s essential to buff up the security of your iPhone prior to travel, to prevent a myriad of issues that could potentially go wrong on any trip, when you least expect it.
There are basic measures that any traveler can take:
- Data Backup: Back up your iPhone using iCloud or other cloud storage tools, so that you have a copy of all essential files available in an online location. This would help prevent data loss in the scenarios of phone loss, theft, or damage.
- VPN (Virtual Private Network): Install a VPN app on your iPhone to encrypt your internet connection. A VPN will be particularly useful when you need to assess sensitive financial or corporate data while using public WiFi networks, providing extra security to your iPhone.
- Find My iPhone feature: If you have misplaced or lost your iPhone, this feature will help to track your iPhone as well as lock it remotely. As a worst case scenario, you can even choose to remotely erase your device.
Unfortunately, most people overlook these tools, due to a lack of awareness. To save you the trouble of navigating unfamiliar settings, I cover these steps on securing your iPhone in comprehensive detail so that you can be fully prepared and have largely stress-free trips.